
How to remove extended nails at home?
To extended nails has always been an ambiguous attitude. Some girls consider them very beautiful and elegant, while others call them complete bad taste. Be that as it may, now this option is considered one of the most practical in everyday life. As for the removal process, you can do it yourself.
Of course, if there is a financial opportunity, it is better to sign up with the master. He will do everything as accurately and correctly as possible. It will be more difficult to do this on your own, as you need to understand the details. Otherwise, you can slightly damage the surface of the marigold, after which it will be difficult to restore it. It is also worth noting that you need to remove acrylic and gel nails in different ways. Therefore, you must be sure what kind of material on the nails.

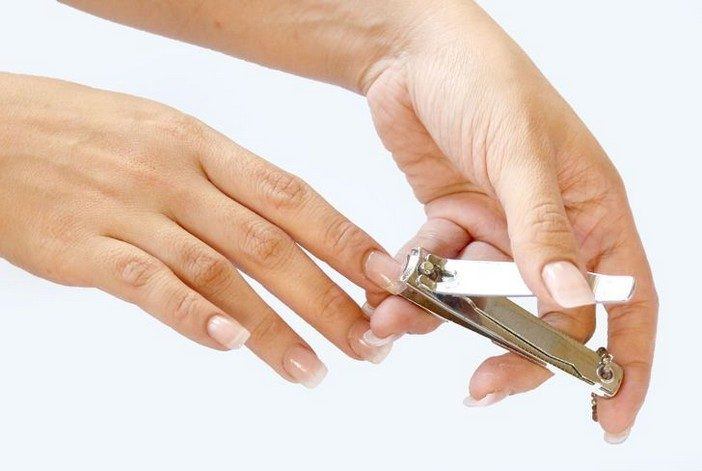
In any case, the first stage is preparatory. It consists in removing the free edge of each nail. This is best done with a special tool called tip cutter. If you don’t have one, then simple manicure forceps may be an alternative. This must be done with special care so as not to damage the nail plate. By the way, this stage is necessary for both acrylic and gel nails. Therefore, only after it can you begin to remove the coating.

How to remove acrylic nails at home?
Contrary to popular belief, filming such material yourself is very difficult. Firstly, this requires a special fluid. You can buy it only in specialized stores. It is best to choose a liquid of the same company as acrylic. Then the removal process will be as quick as possible.

If it is not possible to purchase just such a liquid or you do not know the name of the company, then you can use liquid to remove varnish. However, it must be with acetone. Please note that this method is very harmful to the nails and cuticle, so you should choose it only as a last resort.
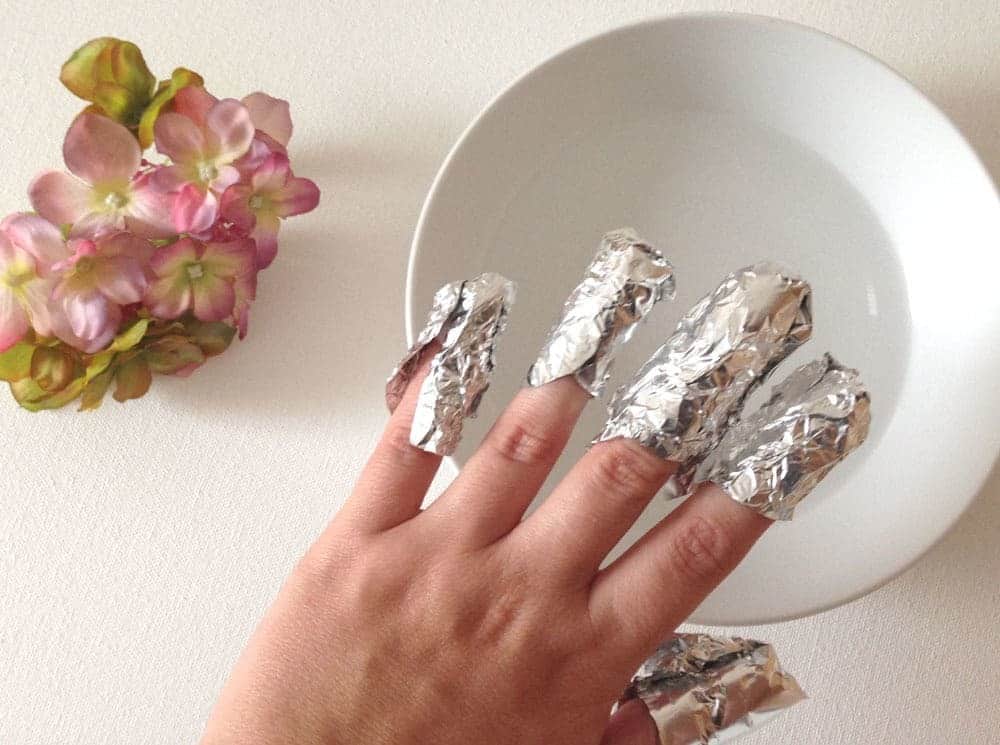
Also for this you need foil and good cotton pads. The foil must be cut into rectangles of this size in advance so that each finger can be wrapped.
But before using the liquid, be sure to carefully prepare the nails. Using a coarse saw file, treat the coating of each nail in such a way as to remove all acrylic as much as possible. It’s quite difficult, but still try to do everything with high quality.

After all the nails are processed, proceed to the next step. To do this, apply liquid to a cotton pad and apply to the nail. Wrap it with a piece of foil so that the air does not penetrate inside. We repeat the same thing with each nail and leave them no less than forty minutes. During this time, the coating will become as soft and visually similar to jelly.
We remove a cotton pad with foil from one nail and carefully remove the remaining coating with an orange stick. This must be done very quickly so that the acrylic does not have time to freeze. Repeat the same with each fingernail.
After finishing the nail removal procedure, be sure to wash your hands in warm water and soap. Also apply a nourishing cream or oil for cuticles and nails. Remember that no matter how you try to do everything well, nails after such a procedure must be restored. Therefore, do not build or stain them for at least one month.

How to remove gel nails on your own?
As you can see, the process of removing acrylic nails is complex and very time-consuming. However, with a gel coating, the situation is even worse. The fact is that in the cabin a special apparatus is used for this. This allows you to do the procedure quite quickly.As for nail removal at home, it will take a lot of effort. Since gel nails cannot be softened or dissolved. In addition, this process will take quite a lot of time. Therefore, if possible, we recommend that you still contact the master.

If you decide to do it yourself, you will need a file with a rough coating, as well as a file for polishing and a special brush. There will be a lot of dust in the process, so we recommend wearing glasses and not putting your nails too close to your eyes. This is because in the process you may be injured by the material. It is also worth protecting the airways and wearing a mask.
As for the removal process, first you need to prepare the nails. That is, cut off the free edge of each of them. This will significantly speed up the process of removing the gel. Next, treat the nail file with a nail so as to cut off the top layer. In the process, you can wipe the nail with a cotton pad with liquid. Doing this is necessary in order not to accidentally damage the nail plate and clearly see where the gel still remains. Repeat the same with each nail.
After that, proceed to the treatment of nails with a polishing file. It will help make them more even and smooth. In the end, be sure to wash your hands with soap and apply your favorite nourishing cream.

Nail care after extension
Even if you removed the nails as accurately as possible, the probability of their damage is high. Therefore, it is very important to do their restoration and not to apply varnish for a month. This period will be enough to make them stronger.
Oils are best suited for nail care. They can be applied directly to the plate and cuticle or to make baths. To do this, mix olive oil, as well as grape seed or apricot, and then heat in a water bath. Dip the nails in a bowl for ten minutes, then rinse with plain water. By doing this procedure two to three times a week, you can significantly change the condition of the nails.

Of course, the process of nail removal is very complex and lengthy, especially at home. But if there is no other option, then try to do everything as qualitatively as possible so as not to harm your nails.


To answer
Want to join the discussion?Feel free to contribute!